Aim: This process aims to claim your Google My Business listing to your WordPress website help customers find your website easily and quickly, leading to more foot traffic and sales.
Optimal Outcome: The main goal of this procedure is to successfully claim your Google My Business listing to your WordPress website to maximize your chances of being identified by potential consumers and, as a result, your income.
What do you need to start: You must have a WordPress website and Google website to start this process.
Why is this SOP Important: Claiming your Google Business listing is an essential step for any business, including those using WordPress, to ensure that you are presenting accurate and up-to-date information to potential customers and maximizing your online visibility.
When and Where to execute: Listing your WordPress website on Google My Business should be done as soon as possible. It’s important to have a Google My Business listing if you want to improve your local search engine visibility and make it easier for potential customers to find your business online.
Who Should Be Doing This: As the owner of your WordPress website, you are responsible for listing your website on Google My Business.
What is Google My Business listing?
Google My Business is a free online tool provided by Google that allows business owners to manage their online presence on Google. It is a listing that appears when someone searches for your business on Google or Google Maps.
With a Google My Business listing, you can provide important information about your business, such as your business name, address, phone number, hours of operation, website URL, and other details. You can also manage and respond to customer reviews, add photos and videos of your business, and share updates and promotions with your audience.
Having a Google My Business listing can improve your local search engine visibility, making it easier for potential customers to find your business online. It can also help you establish trust with your audience and engage with customers more effectively.
Google My Business is an essential tool for any business owner who wants to optimize their online presence and improve their local SEO. It’s a free and easy-to-use tool that can help you attract more customers and grow your business.
You should log in, using the Google Website that you are using to manage your business. If you don’t have one, we suggest you create one, so you can keep your business in a professional manner and differ it from your personal website.
3. Once you sign in, click on the “Google apps” button.
4. Select “My Business”.
5. You will be redirected to the Google My Business app page. Click on “Manage now”.
6. Start off by entering your company name into the box.
7. After you put your company name, the pop-up will appear – click on “Create company with that name”.
8. First, you should fill in with your Business name (1) – it should be filled automatically after the previous step. Then select the Business category (2).
9. Just start typing the category of your business. Select card from the list that will appear.
10. Try to choose the category as accurately as possible. You will be able to change it or add more later. To move to the next step, click on “Next”.
11. Now it is time for you to give a location of your business. It will allow your business to appear in Google Maps. We recommend you put your office address even if your business allows you to work remotely.
12. Select “Yes” and click on “Next”. (If you choose not to give your business address you can skip this step)
13. Simply fill in with your business address and click on “Next”.
14.Choose if you provide services to customers away from your location and click on “Next”.
15. If you choose that you provide services to another location, try to add those areas to your business profile.
16. Simply, start typing the locations into the box and select them as they will appear in the results.
17. When you finish adding locations, click on “Next”.
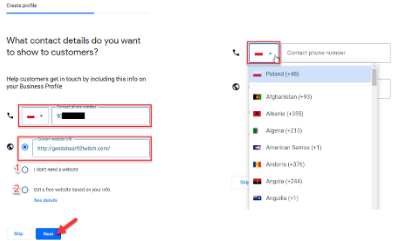
18. Add contact information that you want to show your customers. Fill in with “Contact phone number” and “Current website URL”. You can select if you don’t need a website (1), or you can get a free website from Google (2). Click on “Next” to move to the next step.
Remember to choose the correct prefix from the list, while you are putting your contact phone number.
19. Choose if you want to receive recommendations from Google for your business. We highly recommend you choose “Yes” – those recommendations could be very helpful. Click on “Next”.
20. Now it is time to choose a way to verify your business. The method will vary based on your location and if you choose to select a place for your business. We will select the most common method, which is “Postcard by mail”. Google will send you a postcard with a verification code to the address of your business. Remember to fill in “Contact name” – the person who should receive the postcard. Then click on “Mail”.
21. Your postcard is on the way! Click on “Continue”
22. If you are working within business hours, now you should add them. If not choose to skip that step.
23. To add business hours, simply click on the weekly chart and select the correct hours.
24. Once finished, click on “Next”.
25. Choose if you want to “Accept Messages” from your customers with the slider and click on “Next” (You can also skip that step).
26. You can add your business description. You can also skip this step but it is always a good practice to describe your business for potential customers.
27. Click on “Next” (or “Skip” if you decide not to give a description).
28. Consider adding photos of your work or service. Simply click on “Add photos” and select desired pictures from your computer.
29. Click on “Next”.
30. When you are creating your Google My Business website for the 1st time, Google will offer you some free credits to spend on Google Ads. You can choose to “Claim Now” the credits (You will be redirected to Google Ads app when you will have to add a campaign) or you can skip this step and claim those credits later – they will be waiting for you on the main screen of your profile.
31. It is almost ready. Click on “Continue”.
32. And there it is – your Google Business dashboard
From here you can claim your Google Ads credits
Also, after receiving the verification code you will be able to put it here to complete your My Business website.
33. On the left side of the screen, you will see the menu that will allow you to manage your business on Google. But now you are ready to spread your business!
Conclusion
You’re done! Always remember that it’s important to keep your Google My Business listing up to date with accurate information and respond promptly to customer reviews to improve your online presence and attract more customers to your WordPress website.
Here are some reasons why you should list your WordPress website on Google My Business:
Improve Local SEO: When you create a Google My Business listing, your business will appear on Google Maps, local search results, and Google’s Knowledge Graph. This will help your business show up in local search results, making it easier for potential customers to find you.
Increase Visibility: Google My Business allows you to provide important information about your business, such as your address, phone number, hours of operation, and website. This information is displayed prominently in search results and on Google Maps, making it easy for potential customers to find and contact you.
Engage with Customers: With Google My Business, you can respond to customer reviews, post updates and photos, and engage with your audience. This can help you build a stronger online presence and establish trust with your customers.
Track Performance: Google My Business provides analytics that allow you to track how many people are viewing and engaging with your listing. This can help you understand how well your business is performing online and make adjustments as needed.
Execution Checklist:
Go to the Google My Business website (https://www.google.com/business/) and sign in using your Google website. If you don’t have a Google website, you’ll need to create one first.
Click on the “Manage now” button.
Enter your business name and address. If your business is already listed on Google, you’ll be able to claim the listing. If not, you’ll need to create a new listing.
Verify your business. Google will send you a verification code by mail or phone, which you’ll need to enter to verify your business.
Complete your business profile by adding your business hours, phone number, website URL, and other important details.
Once your listing is complete and verified, it will appear on Google Maps and in local search results.