Edit/Add robot txt file to WordPress
Estimated time to execute: 25 to 30 minutes

Aim: To edit or add a robots.txt file in WordPress for controlling search engine crawlers’ access to your website.
Optimal Outcome: The robots.txt file is properly added to WordPress website without any issues or technical errors.
What do you need to start: You must have a WordPress website and backend access.
- Ensure you have administrator access to your WordPress website.
- Familiarize yourself with the purpose and syntax of a robots.txt file.
Why is this SOP Important: Adding a robots.txt file to a WordPress website is important because it helps control how search engines crawl and index the website’s pages.
When and where to execute: This SOP may be used whenever you need to set up your website for the first time. It can also be done as needed to add or modify information continuously.
Who Should Be Doing This: The person in charge of website administration or analytics.
What is Robot txt File?
The robots.txt file instructs search engine bots, also known as crawlers, on which pages to request from your online website. Every WordPress website comes with a set of robots by default. txt file optimized for Search Engine Optimization (SEO). Search engines utilize your sitemap to rank your online website in the search results.
A robots.txt file is a small text file that resides in the root directory of a website and provides instructions to search engine robots, also known as crawlers or spiders, on which pages should or should not be crawled or indexed.
Execution
-
Edit a robots.txt file
- Access WordPress Dashboard:
- Open your web browser and enter the URL for your WordPress admin dashboard (e.g., https://yourwebsite.com/wp-admin).
- Log in using your administrator credentials.
- Navigate to the Robots.txt Editing Area:
- Once logged in, go to the “Settings” menu on the left sidebar.
- Click on “Reading” within the “Settings” menu.
- Locate the Robots.txt Editor:
- Scroll down to the “Search Engine Visibility” section.
- Edit/Add Robots.txt File:
- To edit an existing robots.txt file:
- If there’s an existing robots.txt file, you’ll see a text box where you can make modifications.
- Carefully edit the file to allow or disallow specific web crawlers as needed.
- Ensure your edits adhere to the correct syntax of a robots.txt file.
- Click the “Save Changes” button to save your modifications.
- To add a new robots.txt file:
- If there’s no existing robots.txt file, you can create a new one in the text box provided.
- Enter the directives you want to use to control crawler access. For example:
javascriptCopy code
User-agent: * Disallow: /wp-admin/ Allow: /wp-admin/admin-ajax.php
- Ensure proper syntax is maintained, and follow best practices for robots.txt files.
- Click the “Save Changes” button to save your new robots.txt file.
- Test Your Robots.txt File:
- After editing or adding the robots.txt file, it’s essential to verify that it’s functioning as intended. You can use Google’s Search Console’s robots.txt testing tool for this purpose.
- Monitor and Maintain:
- Regularly monitor your website’s performance in search engines.
- Make updates to the robots.txt file as necessary based on changes in your website structure or SEO strategy.
Conclusion: Creating and maintaining a well-structured robots.txt file is essential for ensuring that search engine crawlers access your WordPress website as intended. Follow this SOP to make necessary edits or additions to your robots.txt file, and regularly review and update it to meet your SEO goals and website requirements
Check your robots.txt
- Navigate to Google’s robots.txt Tester tool.

2. Add the link of the site you want to test and click Continue.

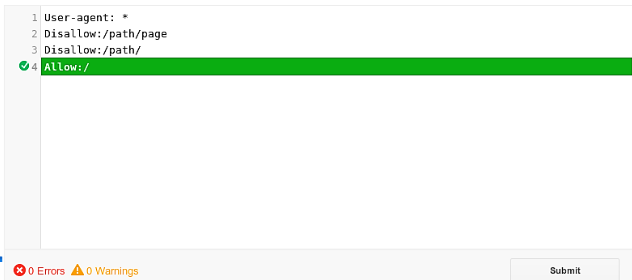
3. Go to the bottom of the page and type any Link into the URL box before clicking the red TEST button.
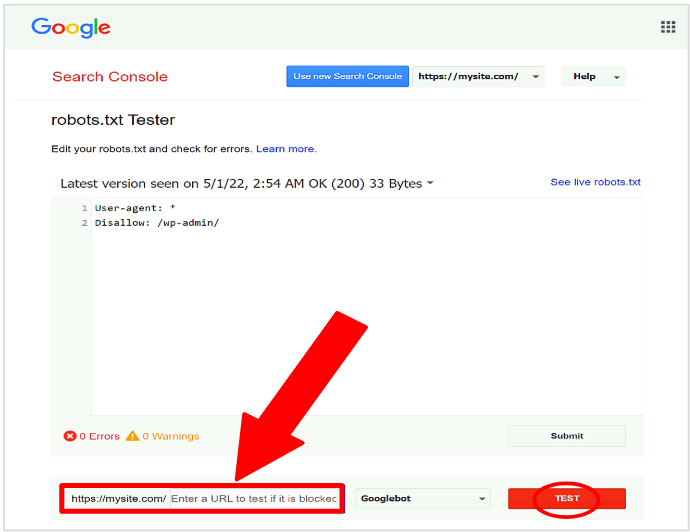
4. Congratulations. You have successfully added robot.txt files. To ensure that everything is crawlable, you must see an Allowed green font result.
Conclusion
You’re done! Keep in mind that Adding a robots.txt file to a WordPress website is important because it helps control how search engines crawl and index the website’s pages. A robots.txt file is a small text file that resides in the root directory of a website and provides instructions to search engine robots, also known as crawlers or spiders, on which pages should or should not be crawled or indexed.
In a WordPress website, the robots.txt file can be used to:
- Block search engines from indexing certain pages or directories that should not be indexed, such as admin pages, test pages, or duplicate content pages. This can help prevent duplicate content issues and keep sensitive information private.
- Improve crawl efficiency and speed by directing search engine crawlers to focus on important pages or sections of the website, such as product pages, category pages, or collections.
- Prevent search engines from crawling certain files or directories containing sensitive or private information, such as customer data or financial information.
Overall, adding a robots.txt file to a WordPress website can help ensure that the website is crawled and indexed more efficiently and effectively, while also helping to protect sensitive information and prevent duplicate content issues.
Execution Checklist:
- Go to Online Website > Themes from your WordPress admin.
- Click Actions, then Edit Code.
- Choose robots after clicking Create a new template.
- Choose Create template.
- Apply the desired adjustments to the default template.
- Save any modifications to your published theme’s robots.txt.liquid file.